
6.10 ツリー

6.10.1 木構造のデータを表示する
フォルダ階層や組織構造のような木構造のデータを表示するにはツリーコントロールが適しています。ツリーは、メニューの用に、子項目を持つ項目を任意の数だけ表示することができ、必要に応じて項目が保有している子項目を展開して表示することができます。
ツリーを表示するには System.Windows.Controls.TreeView クラスを使います。
System.Object
   System.Windows.Threading.DispatcherObject
     System.Windows.DependencyObject
       System.Windows.Media.Visual
         System.Windows.UIElement
           System.Windows.FrameworkElement
             System.Windows.Controls.Control
               System.Windows.Controls.ItemsControl
                System.Windows.Controls.TreeView
[StyleTypedPropertyAttribute(Property="ItemContainerStyle", StyleTargetType=typeof(TreeViewItem))]
public class TreeView : ItemsControl
このクラスのコンストラクタは、パラメータを受け取りません。
public TreeView ()
TreeView クラスは ItemsControl クラスから派生しているため、Items プロパティから任意の数の項目を追加することができます。文字列や図形などのオブジェクトを項目として追加するだけでは、リストボックスと同じように画面上に項目が列挙されるだけです。木構造のデータを表示するには System.Windows.Controls.TreeViewItem クラスのオブジェクトを項目として追加します。
System.Object
   System.Windows.Threading.DispatcherObject
     System.Windows.DependencyObject
       System.Windows.Media.Visual
         System.Windows.UIElement
           System.Windows.FrameworkElement
             System.Windows.Controls.Control
               System.Windows.Controls.ItemsControl
                 System.Windows.Controls.HeaderedItemsControl
                  System.Windows.Controls.TreeViewItem
[StyleTypedPropertyAttribute(Property="ItemContainerStyle", StyleTargetType=typeof(TreeViewItem))]
[TemplatePartAttribute(Name="PART_Header", Type=typeof(FrameworkElement))]
public class TreeViewItem : HeaderedItemsControl
このコントロールもまた、ItemsControl クラスと子項目を代表するキャプションを提供する HeaderedItemsControl クラスから派生しています。木構造のデータの管理方法は、メニュー項目と考え方は同じです。木構造の項目となる TreeViewItem は、ItemsControl でもあるので、任意の数の子項目を Items プロパティから追加することができます。TreeViewItem オブジェクトの子項目に TreeViewItem を追加していけば、より深い階層に項目を配置できます。
using System;
using System.Windows;
using System.Windows.Controls;

class Test {
	[STAThread]
	public static void Main() {
		TreeViewItem client = new TreeViewItem();
		client.Header = "クライアント";
		client.Items.Add("Windows 95");
		client.Items.Add("Windows 98");
		client.Items.Add("Windows Me");
		client.Items.Add("Windows XP");
		client.Items.Add("Windows Vista");

		TreeViewItem server = new TreeViewItem();
		server.Header = "サーバー";
		server.Items.Add("Windows NT");
		server.Items.Add("Windows 2000");
		server.Items.Add("Windows Server 2003");

		TreeViewItem windows = new TreeViewItem();
		windows.Header = "Windows";
		windows.Items.Add(client);
		windows.Items.Add(server);

		TreeView tree = new TreeView();
		tree.Items.Add(windows);

		Window wnd = new Window();
		wnd.Content = tree;

		Application app = new Application();
		app.Run(wnd);
	}
}
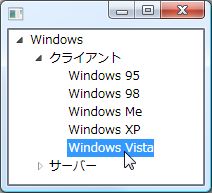
コード1は、Windows 製品郡を表現したツリーコントロールを表示します。ルート項目には "Windows" というテキストを表示する TreeViewItem を用意し、これに "クライアント" や "サーバー" というテキストを表示する TreeViewItem を追加しています。さらに、これらのオブジェクトには、文字列を子項目として追加しています。文字列は子項目を持たないので、この文字列の項目が木構造のリーフとなります。