
レンダリングターゲット

レンダリングターゲットの変更
エフェクトによって頂点が処理され、最終的に生成されたピクセルの出力先をレンダリングターゲットと呼びます。デフォルトのレンダリングターゲットは、バックバッファと呼ばれるメモリ領域です。XNA Framework は、一度バックバッファにピクセルを書き込み、すべての描画が終了してフレームが完成した時点で画面に表示します。これは、構築中のフレームを画面に表示しないようにするためです。バックバッファに対して、現在ゲーム画面に表示されている(プレイヤーが見ている)フレームをフロントバッファと呼ぶこともあります。
通常、ゲームのレンダリングターゲットは、常にバックバッファとなります。しかし、必要に応じてレンダリングターゲットを変更してテクスチャとしてフレームの内容を取得することができます。この性質を利用すれば、画面キャプチャの機能を実装できます。レンダリングターゲットの変更は SetRenderTarget() メソッドを使います。
public void SetRenderTarget (
         RenderTarget2D renderTarget
)
renderTarget パラメータには、設定するレンダリングターゲットを指定します。バックバッファをレンダリングターゲットとする場合は null を指定してください。
レンダリングターゲットには Microsoft.Xna.Framework.Graphics.RenderTarget2D クラスのオブジェクトを設定します。
public class RenderTarget2D : Texture2D
このクラスは Texture2D クラスから派生しており、他のテクスチャと同じように描画結果を 2D イメージとして扱えます。
RenderTarget2D クラスのコンストラクタは、次のようなものがあります。
public RenderTarget2D (
         GraphicsDevice graphicsDevice,
         int width,
         int height
)
graphicsDevice パラメータには、このレンダリングターゲットと関連付ける GraphicsDevice オブジェクトを指定します。width パラメータには幅を、height パラメータには高さをピクセル単位で指定します。
using Microsoft.Xna.Framework;
using Microsoft.Xna.Framework.Graphics;
using Microsoft.Xna.Framework.Input;
using System.IO;

public class TestGame : Game
{
    public static void Main(string[] args)
    {
        using (Game game = new TestGame()) game.Run();
    }

    private GraphicsDeviceManager graphicsDeviceManager;
    private VertexBuffer vertexBuffer;
    private IndexBuffer indexBuffer;
    private VertexPositionColor[] vertices;
    private short[] indices;
    private BasicEffect effect;
    private RenderTarget2D renderTarget;
    private KeyboardState prevKeyState;

    public TestGame()
    {
        graphicsDeviceManager = new GraphicsDeviceManager(this);
        Content.RootDirectory = "Content";
    }

    protected override void Initialize()
    {
        vertices = new VertexPositionColor[] {
	        new VertexPositionColor(new Vector3(0, 0.5F, 0), Color.Red),
	        new VertexPositionColor(new Vector3(0.5F, -0.5F, 0), Color.Blue),
	        new VertexPositionColor(new Vector3(-0.5F, -0.5F, 0), Color.Lime),
        };
        indices = new short[] { 0, 1, 2 };

        base.Initialize();
    }

    protected override void LoadContent()
    {
        vertexBuffer = new VertexBuffer(GraphicsDevice, typeof(VertexPositionColor), vertices.Length, BufferUsage.None);
        vertexBuffer.SetData(vertices);
        GraphicsDevice.SetVertexBuffer(vertexBuffer);

        indexBuffer = new IndexBuffer(GraphicsDevice, IndexElementSize.SixteenBits, indices.Length, BufferUsage.None);
        indexBuffer.SetData(indices);
        GraphicsDevice.Indices = indexBuffer;

        effect = new BasicEffect(GraphicsDevice);
        effect.VertexColorEnabled = true;

        renderTarget = new RenderTarget2D(
            GraphicsDevice,
            GraphicsDevice.PresentationParameters.BackBufferWidth,
            GraphicsDevice.PresentationParameters.BackBufferHeight
        );
        GraphicsDevice.RasterizerState = RasterizerState.CullNone;

        base.LoadContent();
    }

    protected override void Update(GameTime gameTime)
    {
        KeyboardState keyboardState = Keyboard.GetState();
        if (keyboardState[Keys.Space] == KeyState.Down && prevKeyState[Keys.Space] == KeyState.Up)
        {
            GraphicsDevice.SetRenderTarget(renderTarget);
            Draw(gameTime);
            GraphicsDevice.SetRenderTarget(null);

            using (Stream stream = File.Open("ScreenShot.png", FileMode.OpenOrCreate, FileAccess.Write))
            {
                renderTarget.SaveAsPng(stream, renderTarget.Width, renderTarget.Height);
            }
        }
        prevKeyState = keyboardState;

        effect.World *= Matrix.CreateRotationY(MathHelper.ToRadians(2));
        effect.View = Matrix.CreateLookAt(new Vector3(0, 0, 2), Vector3.Zero, Vector3.Up);
        effect.Projection = Matrix.CreatePerspectiveFieldOfView(
            MathHelper.ToRadians(45), 16F / 9F, 1, 10
        );

        base.Update(gameTime);
    }

    protected override void Draw(GameTime gameTime)
    {
        GraphicsDevice.Clear(Color.White);

        foreach (EffectPass pass in effect.CurrentTechnique.Passes)
        {
            pass.Apply();
            GraphicsDevice.DrawIndexedPrimitives(PrimitiveType.TriangleList, 0, 0, vertices.Length, 0, 1);
        }

        base.Draw(gameTime);
    }
}
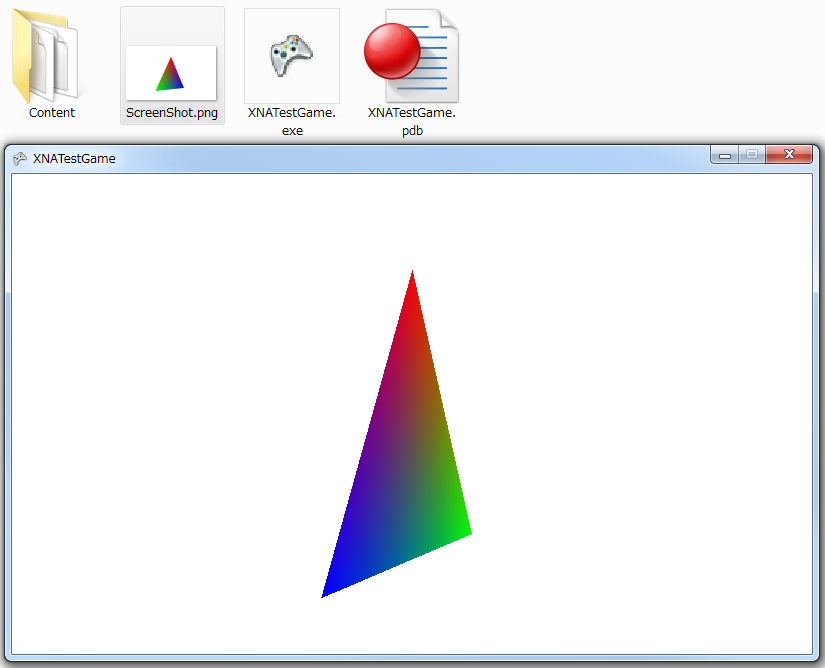
コード1は単純な三角形のプリミティブを描画するだけのプログラムですが、スペースキーが押されるとゲーム画面のスクリーンショットをディスクに保存します。ディスクにアクセスするため、このコードは Windows ゲームのみに対応しています。
スペースキーが押されると、グラフィックスデバイスにレンダリングターゲットを設定して Draw() メソッドを呼び出し、RenderTarget2D オブジェクトに対して描画を行います。その後、レンダリングターゲットをバックバッファに戻して、RenderTarget2D を PNG ファイルとしてディスクに保存します。実行ファイルのフォルダを見ると ScreenShot.png という PNG ファイルが作られています。ファイルを開ければ、XNA Framework で描画していた内容が、画像ファイルとして保存されていることを確認できます。