
アルファ合成

背景とプリミティブを合成する
プリミティブをラスタライズして出力されるピクセルは、頂点の色やテクスチャによって決定されます。例えば頂点の色には ARGB 形式の色を設定することができますが、既定の設定ではアルファ値を用いた合成は無効に設定されています。よって、アルファ値に関係なくプリミティブの描画は新しいピクセルの色で塗りつぶします。テクスチャの場合も同様で、透過色は黒と合成されます。プリミティブの色やテクスチャのアルファ値は、既存のピクセルと合成されることはありません。
描画するプリミティブをアルファ値に基づいて背景と合成するには、描画するグラフィックスデバイスを表す GraphicsDevice オブジェクトの BlendState プロパティを設定します。
public BlendState BlendState { get; set; }
このプロパティには合成方法を表す BlendState オブジェクトを設定します。BlendState クラスについては「スプライトの重ね合わせ」で解説したとおりです。既定の設定では元のピクセルを新しいピクセルで上書きする不透明の組み込みの合成ステートオブジェクトが設定されています。このオブジェクトは BlendState クラスの Opaque フィールドから得られるオブジェクトと同じです。
public static readonly BlendState Opaque
このオブジェクトに代わって、アルファ合成を行う AlphaBlend フィールドから得られる組み込みの合成ステートオブジェクトを、上記の BlendState プロパティに設定することで、ピルセルのアルファ合成が可能になります。
using Microsoft.Xna.Framework;
using Microsoft.Xna.Framework.Graphics;

public class TestGame : Game
{
    public static void Main(string[] args)
    {
        using (Game game = new TestGame()) game.Run();
    }

    private GraphicsDeviceManager graphicsDeviceManager;
    private VertexBuffer vertexBuffer;
    private IndexBuffer indexBuffer;
    private BasicEffect effect;
    private VertexPositionTexture[] vertices;
    private short[] indices;

    public TestGame()
    {
        graphicsDeviceManager = new GraphicsDeviceManager(this);
        Content.RootDirectory = "Content";
    }

    protected override void Initialize()
    {
        Vector3 pt1 = new Vector3(-0.5F, 0.8F, 0);
        Vector3 pt2 = new Vector3(0.5F, 0.8F, 0);
        Vector3 pt3 = new Vector3(-0.5F, -0.8F, 0);
        Vector3 pt4 = new Vector3(0.5F, -0.8F, 0);

        Vector2 uv1 = new Vector2(0, 0);
        Vector2 uv2 = new Vector2(1, 0);
        Vector2 uv3 = new Vector2(0, 1);
        Vector2 uv4 = new Vector2(1, 1);

        vertices = new VertexPositionTexture[] {
	        new VertexPositionTexture(pt1, uv1),
	        new VertexPositionTexture(pt2, uv2),
	        new VertexPositionTexture(pt3, uv3),
	        new VertexPositionTexture(pt4, uv4),
        };
        indices = new short[] { 0, 1, 2, 1, 3, 2 };

        base.Initialize();
    }

    protected override void LoadContent()
    {
        vertexBuffer = new VertexBuffer(GraphicsDevice, typeof(VertexPositionTexture), vertices.Length, BufferUsage.None);
        vertexBuffer.SetData(vertices);
        GraphicsDevice.SetVertexBuffer(vertexBuffer);

        indexBuffer = new IndexBuffer(GraphicsDevice, IndexElementSize.SixteenBits, indices.Length, BufferUsage.None);
        indexBuffer.SetData(indices);
        GraphicsDevice.Indices = indexBuffer;

        effect = new BasicEffect(GraphicsDevice);
        effect.TextureEnabled = true;
        effect.Texture = Content.Load<Texture2D>("TestImage");

        GraphicsDevice.BlendState = BlendState.AlphaBlend;

        base.LoadContent();
    }

    protected override void Draw(GameTime gameTime)
    {
        GraphicsDevice.Clear(Color.Azure);

        foreach (EffectPass pass in effect.CurrentTechnique.Passes)
        {
            pass.Apply();
            GraphicsDevice.DrawIndexedPrimitives(PrimitiveType.TriangleList, 0, 0, vertices.Length, 0, 2);
        }

        base.Draw(gameTime);
    }
}
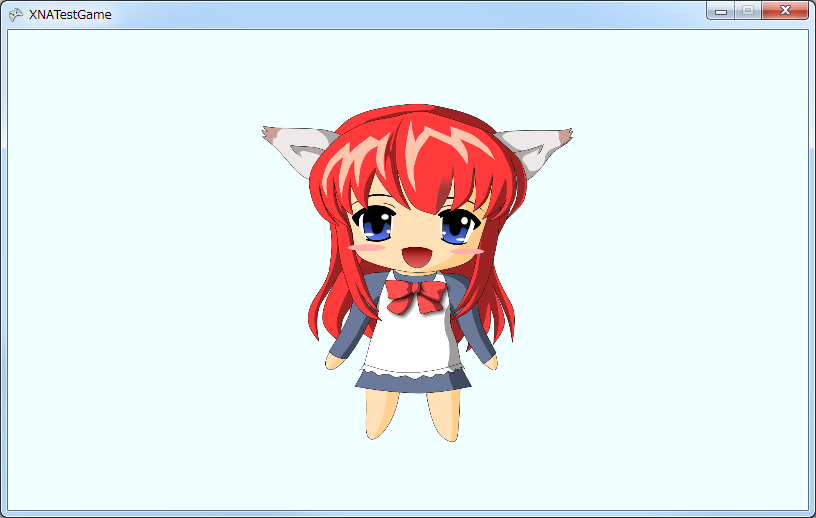
コード1は背景が透明な透過 PNG をテクスチャとして読み込み、描画しています。「テクスチャ コード1」の実行結果と比べると、背景の透過ピクセルが正しく透明になっていることが確認できます。